Scanning Bound Volumes Without Breaking Them
 Priya Raman9 min read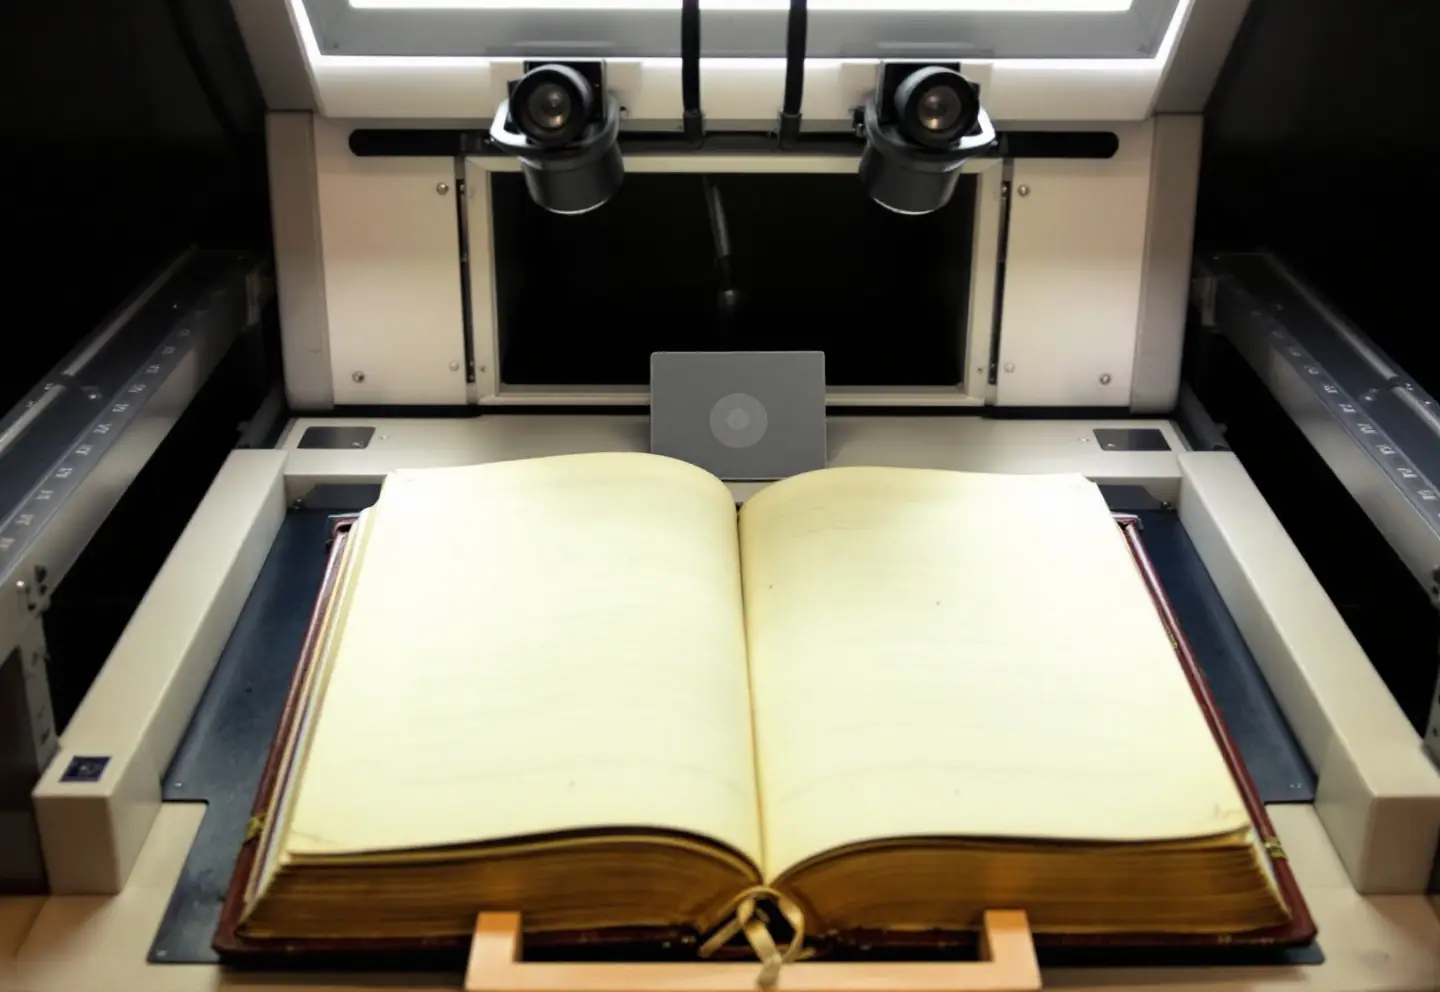
The fastest way to damage a bound volume is to put it face down on a flatbed scanner and lean on the lid. I've seen it done in more than one office, always with good intentions and a deadline. The spine cracks, the sewing gives, a leaf or two comes loose, and the scan still has a dark, blurred band down the gutter where the text curved away from the glass.
Bound volumes are among the most valuable things a records office digitizes (deed books, minute books, vital records registers, tax lists) and among the most awkward. They can't be fed through anything, they rarely open flat, and every page turn is a small mechanical stress on a binding that may already be well over a century old. The good news is that the equipment and methods for doing this well are mature. The less welcome news is that doing it well is slower than most people expect. Both halves matter for planning.
Start with the opening angle
Every binding has an angle it opens to without strain. Some loose, well-made volumes will lie nearly flat. Tight-back leather bindings, adhesive bindings and volumes with narrow inner margins may only be comfortable at 90 to 120 degrees. That angle, not the scanner you happen to own, should decide how the volume is captured.
Test it before scanning. Set the volume on a supportive surface, open it near the middle, let the boards settle on their own, and look at the spine and the gutter. If the boards don't want to go lower, don't push them. Record the angle on your survey sheet along with the paper's condition (brittle corners, tears, earlier tape repairs), loose leaves, foldouts, powdering leather, and any history of water or mold. Anything with active damage goes to a conservator before it goes under a camera.
Choosing the setup
| Setup | How the volume sits | Opening angle | Glass contact | Strengths | Limits | Best for |
|---|---|---|---|---|---|---|
| Flatbed, face down | Pressed open on the glass | Forced toward 180° | Heavy, across the spine | Cheap; already in the office | Breaks spines; gutter distortion | Nothing bound. Loose sheets only |
| Book-edge flatbed | One page on the glass, the rest of the book hanging over the edge | About 90° | Moderate | Gentle for small volumes; low cost | Slow; volume must be turned for each side; heavy books are hard to manage | Small, light volumes in small batches |
| Overhead scanner with flat cradle | Face up, each half on its own self-levelling plate | 150° to 180° | Optional glass platen | Fast; handles large, sturdy volumes | Still needs a wide opening; curvature near the gutter | Sturdy volumes that open freely |
| Overhead with V-cradle | Face up in a V; one camera per page, or one page at a time | About 90° to 120° | Optional V-shaped glass | Kindest to tight and fragile bindings | Slower setup; matching two cameras; higher cost | Fragile, tight or high-value volumes |
| Camera on copy stand with cradle | Face up on a cradle under a mounted camera | Depends on the cradle | Optional | Flexible; modest entry cost | Results depend heavily on operator skill and color management | Small projects with a skilled operator |
If I had to keep one rule from that table, it would be this: never press a spine flat to make the page easier to scan. Every other choice is a trade-off. That one is just damage.
The workflow
1. Survey and sort
Survey every volume in the run as described above and group them by the setup they need. Most projects end up with a majority of volumes that can go on a flat cradle, a minority that need a V-cradle, and a handful that need conservation first.
2. Set the cradle, and keep setting it
A cradle supports both boards and both halves of the text block. As you work through a volume, the left side grows thicker and the right side thinner, so the cradle has to follow, either automatically through a self-levelling design or by the operator every few dozen pages. Foam wedges and small supports fill the gaps under the boards. A board left hanging unsupported drags on the joint with every turn.
3. Glass: lightly, or not at all
A glass platen flattens the page so the text sits in one focal plane. It should rest on the page under its own weight or a light, controlled pressure, and be lifted completely before every page turn. Never slide a leaf under glass. Keep the glass clean, because dust and fingerprints show up in every frame.
Some material shouldn't have glass on it at all: flaking or powdery media, raised seals, very brittle paper that cracks under pressure, and pages with active ink corrosion. Capture those without glass and accept some curvature to correct in software.
4. Light it evenly
Two light sources, one each side at roughly 45 degrees to the page, give even illumination with little glare. LED lighting keeps heat off the volume. Check evenness by capturing a uniform gray card across the whole field; if the corners come out darker than the middle, fix the lights now rather than correcting every file later. Reflections from glass can be tamed with careful light angles or cross-polarization.
5. Targets and color
The Federal Agencies Digital Guidelines Initiative (FADGI) technical guidelines are the reference most US projects work to. They define star levels of image quality, and three-star performance is a common target for archival work. Two kinds of target matter. A device-level target, measured with analysis software, tells you whether the system as a whole is performing: resolution, tone, color accuracy, noise, lighting uniformity. An object-level target, a small color and grayscale chart placed in the frame at the start of each volume or session, documents the conditions those particular images were made under.
For resolution, most projects capture bound manuscript and record volumes somewhere around 300 to 400 pixels per inch at original size. Check the FADGI tables for your material type rather than taking my range on faith.
6. Capture settings
- Masters as uncompressed TIFF, or raw captures converted to TIFF, with an embedded color profile. Many projects use Adobe RGB (1998) or eciRGB v2 for masters and make sRGB derivatives for access.
- 8 bits per channel is usually enough; 16 bits earns its storage on faded or difficult material that will need heavy tonal adjustment.
- No aggressive sharpening or noise reduction on masters.
- Enough depth of field to keep a curved page sharp from gutter to fore-edge. Check focus at the gutter, not just the center.
- The whole leaf with a margin of background around it, so the page edges are visible.
- Covers, spine, edges and endpapers, blank pages, foldouts (in sections if necessary), and loose inserts exactly where they were found.
7. Turning pages
Page turning does the most damage on a bad day, and it's done by hand. Clean, dry hands give better control than gloves for most paper. Lift each leaf at the upper corner, or with a thin spatula slid beneath it, support it through the turn and lay it down; don't flick. Turning from the lower corner, where generations of thumbs have already weakened the paper, is a habit worth breaking. If a leaf is loose, capture it where it sits and note it. Don't reorder anything. Automated page turners exist and suit some modern books, but I wouldn't let one near a fragile register.
8. Curvature correction
Dewarping software can flatten the curve of a page in the image, deskew it and crop it, often with excellent results. Two cautions. Apply it to access derivatives and keep the master as captured, target and all. And no software can recover text hidden in the gutter. If words disappear into the binding at the angle the volume allows, flag the page rather than forcing the volume wider.
9. Naming and metadata
Name files by volume identifier and image sequence, zero-padded: deeds-b014-0001.tif, deeds-b014-0002.tif. Don't build printed page numbers into filenames. Old volumes have skipped numbers, repeated numbers and unnumbered leaves, and a naming scheme based on pagination breaks the first time whoever numbered the pages a century and a half ago slipped. Record the printed pagination in metadata instead, along with which images are covers, blanks or targets. Generate checksums when the files are created, not weeks later.
10. Quality control
Check every image for skipped and duplicated pages, focus, fingers in the frame, gutter loss and cropping. Compare the image count with the page count. Check object targets against the device-level results on a sample. Budget real time for this; in my experience QC can take as long as capture.
Throughput, honestly
People hear "scanner" and picture an office copier. A bound volume in a cradle, turned by hand, with the glass raised and lowered for every page and the cradle adjusted as the volume progresses, moves at a different pace altogether. In my experience a cooperative volume on a good overhead setup might yield a few hundred page images an hour from an experienced operator, and a fragile volume on a V-cradle can manage a small fraction of that. Then add surveying, setup, QC, metadata and file management on top.
Build the budget from real counts: number of volumes, pages per volume, and how many fall into each condition group. If you send the work to a vendor, ask what equipment they'll use for tight bindings, ask for a sample volume first, and write your opening-angle and no-glass instructions into the contract. Our guide to imaging and microfilm for preservation copies covers whether you also need film and how the two fit together.
Volumes that have been through a leak or a flood need extra care: cockled pages, swollen text blocks and warped boards all make cradle work harder. If that's your situation, get them dried and assessed first; water in the records room: the first 48 hours covers the early steps.
When disbinding is the right answer
Sometimes the safest way to scan a volume is to take it apart, capture the leaves flat, and rebind it. But that is the right answer only when the volume is going to be rebound anyway: the sewing has failed, the boards are detached, the text block is breaking up, and a conservator has already decided it needs a new binding. In that case, scanning the leaves while they're separate is easier on them and gives better images.
It is never the right answer just to make scanning faster. Disbinding destroys evidence of how the book was made, it costs money to reverse, and every rebinding takes a little more from the inner margins. The decision belongs to a conservator, not to the scanning schedule, and before anything is taken apart the original binding should be photographed and its structure written down.
A good scanning project leaves the volumes in the same condition they arrived in. That is a perfectly reasonable clause for a contract, and a perfectly reasonable standard for an in-house team to hold itself to.
Keep reading

OCR and Handwritten Text Recognition for Archives: What to Expect
What handwritten text recognition can do for old records: OCR vs HTR, training on a clerk's hand, keyword spotting, ground truth, privacy and project planning.
Environmental Monitoring for a Records Vault: Loggers, Targets and Reading the Graph
A practical checklist for monitoring temperature and humidity in a records vault, with logger placement, dehumidifier advice and how to read the logger graph.
File Formats for Long-Term Preservation: TIFF, PDF/A, JPEG 2000 and the Rest
Choosing preservation file formats: TIFF masters, PDF/A parts, JPEG 2000, PNG, CSV and XML, audio and video, plus checksums, fixity and migration planning.